
A task dashboard can look polished until someone clicks “Add Task” with an empty title, an invalid email, or a due date that has already passed. I have seen this happen often in internal admin panels, client portals, and simple CRUD apps.
Good form validation in React.js catches bad input early and tells users exactly what to fix. It also keeps invalid data from reaching your API, where errors become harder to handle.
In this guide, you will build a practical task form with controlled inputs, field-level errors, submit validation, and a clean reset flow.
Form Validation in React.js: What You Need
Form validation means checking user input before your application accepts or submits it. For a task dashboard, you may want to ensure that:
- A task title is not empty.
- A description has enough detail.
- An assignee email looks valid.
- A due date is selected.
- The user cannot submit until required fields pass validation.
For most React applications, you can start with native JavaScript and the useState hook. You do not need a separate validation library for a small form.
This approach works especially well for task managers, dashboard forms, support-ticket screens, employee portals, and API-driven admin panels.
Build the Task Form State
Start with a functional component. A functional component is a JavaScript function that returns JSX, which is the HTML-like syntax React uses to describe the UI.
Create one state object for form values and another for validation errors.
import { useState } from "react";

const initialFormData = {
  title: "",
  description: "",
  assigneeEmail: "",
  dueDate: "",
};

function TaskForm() {
  const [formData, setFormData] = useState(initialFormData);
  const [errors, setErrors] = useState({});

  return (
    <form>
      {/* Form fields will go here */}
    </form>
  );
}

export default TaskForm;
The component state stores data that can change while users interact with the form. Here, formData holds the current field values, while errors holds messages such as “Task title is required.”
Using separate state objects keeps the code easier to read. Your input fields care about values, while your error messages care about validation results.
If you are new to this pattern, review how a controlled React component works. Controlled inputs give React full control over each field value.
Handle Input Changes
Next, create one reusable function that updates any form field. The input’s name attribute tells React which property to update.
function handleChange(event) {
  const { name, value } = event.target;

  setFormData((currentData) => ({
    ...currentData,
    [name]: value,
  }));
}
The spread operator (...) creates a new object with the existing form values. Then [name]: value replaces only the field that changed.
For example, if the user types “Prepare sprint report” in the title box, React creates a new object like this:
{
  title: "Prepare sprint report",
  description: "",
  assigneeEmail: "",
  dueDate: ""
}
This is an immutable update. Immutability means creating new data instead of directly changing existing state. React relies on new object references to detect updates predictably.
Now add the input fields.
<form>
  <label htmlFor="title">Task title</label>
  <input
    id="title"
    name="title"
    type="text"
    value={formData.title}
    onChange={handleChange}
  />

  <label htmlFor="description">Description</label>
  <textarea
    id="description"
    name="description"
    value={formData.description}
    onChange={handleChange}
  />

  <label htmlFor="assigneeEmail">Assignee email</label>
  <input
    id="assigneeEmail"
    name="assigneeEmail"
    type="email"
    value={formData.assigneeEmail}
    onChange={handleChange}
  />

  <label htmlFor="dueDate">Due date</label>
  <input
    id="dueDate"
    name="dueDate"
    type="date"
    value={formData.dueDate}
    onChange={handleChange}
  />

  <button type="submit">Add Task</button>
</form>
Each field uses value={formData.fieldName} and onChange={handleChange}. This makes the input controlled by React state rather than letting the browser manage it alone.
The same event-handling pattern works for dropdowns, checkboxes, search fields, and filter controls. For more examples, see handling events in React.js.
Add a Validation Function
Now create a function that checks every field and returns an error object. Returning an object makes it easy to display errors beside the related input.
function validateForm(values) {
  const newErrors = {};

  if (!values.title.trim()) {
    newErrors.title = "Task title is required.";
  } else if (values.title.trim().length < 3) {
    newErrors.title = "Task title must contain at least 3 characters.";
  }

  if (!values.description.trim()) {
    newErrors.description = "Please add a task description.";
  } else if (values.description.trim().length < 10) {
    newErrors.description = "Description must contain at least 10 characters.";
  }

  if (!values.assigneeEmail.trim()) {
    newErrors.assigneeEmail = "Assignee email is required.";
  } else if (!/\S+@\S+\.\S+/.test(values.assigneeEmail)) {
    newErrors.assigneeEmail = "Enter a valid email address.";
  }

  if (!values.dueDate) {
    newErrors.dueDate = "Select a due date.";
  }

  return newErrors;
}
This function receives the current form values and checks them one by one. If a field fails a rule, it adds a message to newErrors.
The .trim() method removes leading and trailing spaces. Without it, users could enter several spaces in the title field and pass a simple empty-value check.
The email regular expression is intentionally simple. It catches common mistakes like missing @ or a missing domain extension. Your backend should still validate email addresses because frontend validation improves the user experience but does not secure your server.
Validate When the Form Submits
A submit handler runs when users click the button or press Enter. It should stop the browser’s default page refresh, validate the data, and continue only when the form has no errors.
function handleSubmit(event) {
  event.preventDefault();

  const validationErrors = validateForm(formData);

  if (Object.keys(validationErrors).length > 0) {
    setErrors(validationErrors);
    return;
  }

  setErrors({});

  const newTask = {
    id: crypto.randomUUID(),
    ...formData,
    createdAt: new Date().toISOString(),
  };

  console.log("Task ready to save:", newTask);

  setFormData(initialFormData);
}
event.preventDefault() stops the normal HTML form behavior, which would reload the page. React applications usually handle the submission in JavaScript instead.
Object.keys(validationErrors).length checks whether the validation object contains any error fields. If it does, React stores those errors and exits the function with return.
When validation passes, the example creates a task object with a unique ID and timestamp. In a real dashboard, this is where you would call your API or pass the task to a parent component through props.
Pro Tip: I’ve found that clearing the form only after validation succeeds prevents a frustrating bug where users lose their input after one invalid field. Keep the submitted values in state until the API confirms that the save worked.
Show Errors Beside Each Field
Users need immediate, clear feedback. Render an error message below each field only when that field has an entry in the errors object.
<div>
  <label htmlFor="title">Task title</label>
  <input
    id="title"
    name="title"
    type="text"
    value={formData.title}
    onChange={handleChange}
    aria-invalid={Boolean(errors.title)}
    aria-describedby={errors.title ? "title-error" : undefined}
  />

  {errors.title && (
    <p id="title-error" role="alert" className="error-message">
      {errors.title}
    </p>
  )}
</div>
This uses conditional rendering, meaning React renders the paragraph only when errors.title contains a message.
The aria-invalid attribute tells assistive technology that the field has a problem. The aria-describedby attribute connects the input to its error text. These small details make forms more accessible for keyboard and screen-reader users.
Repeat this pattern for the other inputs.
{errors.description && (
  <p role="alert" className="error-message">
    {errors.description}
  </p>
)}

{errors.assigneeEmail && (
  <p role="alert" className="error-message">
    {errors.assigneeEmail}
  </p>
)}

{errors.dueDate && (
  <p role="alert" className="error-message">
    {errors.dueDate}
  </p>
)}
Clear Errors While Typing
Submitting a form, correcting one field, and still seeing its old error feels broken. Improve the experience by removing an error as soon as the user changes that field.
Update handleChange like this:
function handleChange(event) {
  const { name, value } = event.target;

  setFormData((currentData) => ({
    ...currentData,
    [name]: value,
  }));

  setErrors((currentErrors) => {
    if (!currentErrors[name]) {
      return currentErrors;
    }

    const { [name]: removedError, ...remainingErrors } = currentErrors;
    return remainingErrors;
  });
}
The first state update changes the form value. The second removes only the error that belongs to the field being edited.
This uses object destructuring. { [name]: removedError, ...remainingErrors } extracts the current field error and creates a new object with every other error intact.
Avoid changing the existing errors object directly. React state updates should always use a new object, array, or primitive value. This keeps re-renders reliable and makes debugging much easier.
Validate Fields on Blur
Submit validation works well for short forms. For longer forms, you can also validate a field when users leave it. This event is called onBlur.
function handleBlur(event) {
  const { name } = event.target;
  const fieldErrors = validateForm(formData);

  setErrors((currentErrors) => ({
    ...currentErrors,
    [name]: fieldErrors[name],
  }));
}
Then add onBlur={handleBlur} to each input.
<input
  id="assigneeEmail"
  name="assigneeEmail"
  type="email"
  value={formData.assigneeEmail}
  onChange={handleChange}
  onBlur={handleBlur}
/>
This validates the email field when a user tabs away or clicks elsewhere. It works well for registration forms, settings pages, and multi-field admin forms.
Use blur validation carefully. Showing every error while users are still typing can feel aggressive. I usually validate required fields on blur and run the full validation again on submit.
Keep Form Logic Reusable
As forms grow, move reusable logic into a custom hook or separate utility file. For example, you can place validateForm in taskValidation.js and import it into your form component.
You can also pass field components through props when a project has repeated input layouts. A reusable FormField component can accept a label, input type, value, error message, and change handler.
function FormField({ label, name, value, error, onChange }) {
  return (
    <div>
      <label htmlFor={name}>{label}</label>
      <input
        id={name}
        name={name}
        value={value}
        onChange={onChange}
        aria-invalid={Boolean(error)}
      />
      {error && <p role="alert">{error}</p>}
    </div>
  );
}
You can see the output in the screenshot below.
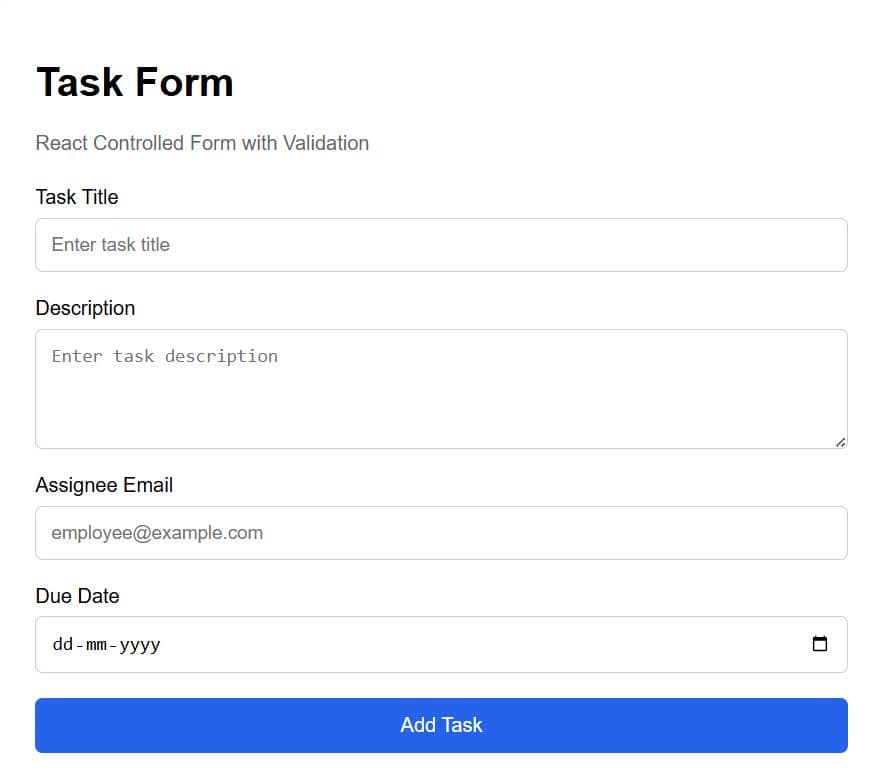
This avoids copying the same label, input, and error markup across several forms. It becomes especially useful in dashboards with task forms, employee forms, customer forms, and configuration screens.
Things to Keep in Mind
- Do not mutate form state: Never assign values directly, such as
formData.title = "New task". Use the setFormData function with an immutable update. - Validate on the server too: Client-side validation improves usability, but users can bypass it. Your API must enforce the same important rules.
- Use clear error messages: “Enter a valid email address” helps more than “Invalid input.” Tell users what to fix.
- Avoid validating too early: Showing errors before users interact with a field can create a poor experience. Use submit or blur validation first.
- Keep errors separate from values: Store form data and validation messages in different state objects. This makes resets and updates easier to manage.
- Use stable field names: The input
namevalues must match the properties in your state object and error object.
Frequently Asked Questions
How do I add form validation in React.js?
Use useState to store form values and errors. Create a validation function that returns an error object, then call it from your form submit handler. Render each error conditionally below its related field.
Why should I use controlled inputs for React forms?
Controlled inputs keep the displayed value inside React state. This makes it easier to validate values, reset fields, prefill data from an API, and display errors consistently.
Can I validate a React form without a library?
Yes. Basic React form validation only needs useState, event handlers, and JavaScript conditions. This works well for small and medium forms with straightforward rules.
Should I validate fields on change or on blur?
Use onBlur when you want feedback after users finish a field. Use submit validation as the final check. Avoid heavy validation on every keystroke unless the feedback is genuinely useful.
How do I reset a validated form in React?
Set the form state back to its initial object and clear the errors object. Only reset after a successful submission so users do not lose invalid or unfinished input.
Is frontend validation enough for API forms?
No. Frontend validation helps users correct mistakes before submission, but backend validation protects your data. Always validate required fields, permissions, formats, and business rules on the server.
Form validation in React.js becomes manageable when you keep values, errors, and submission logic separate. Start with controlled inputs and an immutable validation flow, then add blur validation or reusable field components when your form grows. I hope you found this article helpful.
You May Also Like
- How to reset a form in React.js
- How to fetch and display API data in React
- React component state management explained
- How props work in React.js
- Understanding React conditional rendering

Bijay Kumar is an experienced Python and AI professional who enjoys helping developers learn modern technologies through practical tutorials and examples. His expertise includes Python development, Machine Learning, Artificial Intelligence, automation, and data analysis using libraries like Pandas, NumPy, TensorFlow, Matplotlib, SciPy, and Scikit-Learn. At PythonGuides.com, he shares in-depth guides designed for both beginners and experienced developers. More about us.

