In this Python tutorial, I will show you how to create an API in Django Rest Framework using Generic Class API.
I will explain to you “what is API and REST API?” and its work. Then I will show you how to create a REST API by building the Django project or application where you can retrieve and add customer data.
Additionally, I will discuss serializers and the generic classes such as ListCreateAPIView that exist in the Django Rest Framework.
Create Rest API Using Django Rest Framework
Django Rest Framework is also called DRF in short, it is a toolkit that helps in creating Web APIs in a very easy way. But before you need to know about the term API.
What is an API?
API stand for Application Programming Interface that allows communication between applications (software programs). In simple words, different programs can talk to each other through the API.
So API acts as a bridge among the applications. Let’s understand with an example, you know that a web application has two parts front-end and back-end, and suppose the front-end is developed using React (which uses Javascript) and the backend is developed using Django (which uses Python).
To establish communication ( so that they can talk to each other) with this front-end and back-end which are developed using the different programming languages. APIs act as a bridge between these two front-end and back-end to make that communication possible.
Now you know about the term APIs, but there is one more term that is used with API and it is called REST.
What is REST API?
REST stands for Representational State Transfer is a type of architecture or standard that makes communication very easy between systems. REST has some set of rules that should be followed by APIs such as stateless, decoupled, layered and cacheable. Explanation of these rules is beyond this tutorial.
Working of REST API
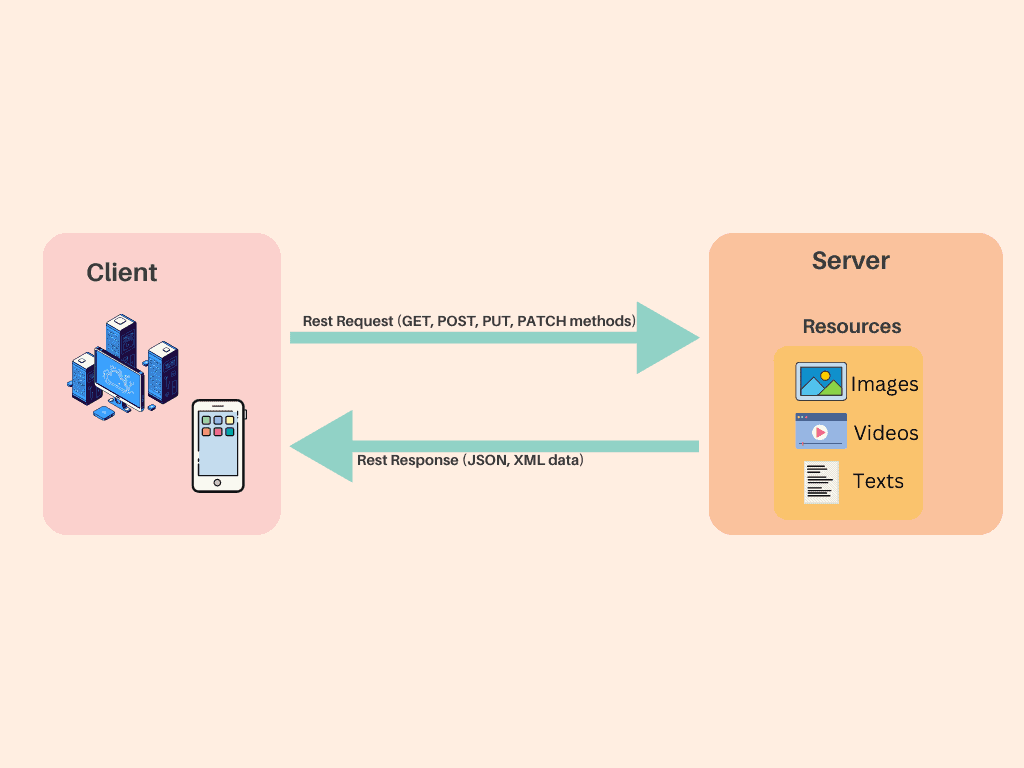
There are three things that you need to know, the client, the server, and the resources.
The client is a program that runs on a mobile or computer, the server has an API that can be used to access its resources or services, and the resources are the information or content (such as text, video, audio and etc) on the server which is provided to the client in response.
The client sends a REST request to the server to get the specific piece of information or resource and in response, the server returns a REST response that is the resource or data in encoded form.
The REST request contains four parts:
- HTTP method: It defines what kind of operation should be performed with resources. For that, it has four methods :
- POST method: To create a data
- GET method: To get or receive the data
- PUt method: To update the data
- DELETE method: To delete the data
- Endpoint: This tells where and how to find the requested resources on the server.
- For that, it has an identifier called URI (Uniform Resource Identifier) which helps in finding where resources exist on the server. So when you type any URL in your browser that URL is a type of URI.
- Headers: It store the information related to the client and server and stores the IP address of the server wherever it is installed. Also stores the API key, name, and what will be the format of the response.
- body: It contains the extra information that is sent to the server. It can be any information that you want to add or remove or update to the server.
Whenever the server responds to a REST request with a REST response, it doesn’t include the exact resource but instead, it includes the representation of that resource which is the kind of description in machine-readable format of the current state.
The resources can be represented in many formats such as JSON, XML, TEXT and etc.
Now you understand APIs that obey the REST rules or follow the REST architecture style is called REST APIs.
Setup up Project to Create Rest API in Django
First, create a virtual environment using the below commands.
python -m venv apienvThen activate this environment ‘apienv’ using the below code.
api\Scripts\activate Install Django using the below command.
pip install djangoCreate a Django project using the below command.
django-admin startproject rest_api .Create a Django app using the below command.
django-admin startapp restapi_app
Now you can open the project in any IDE (visual studio code) or you can continue with the terminal or command prompt.
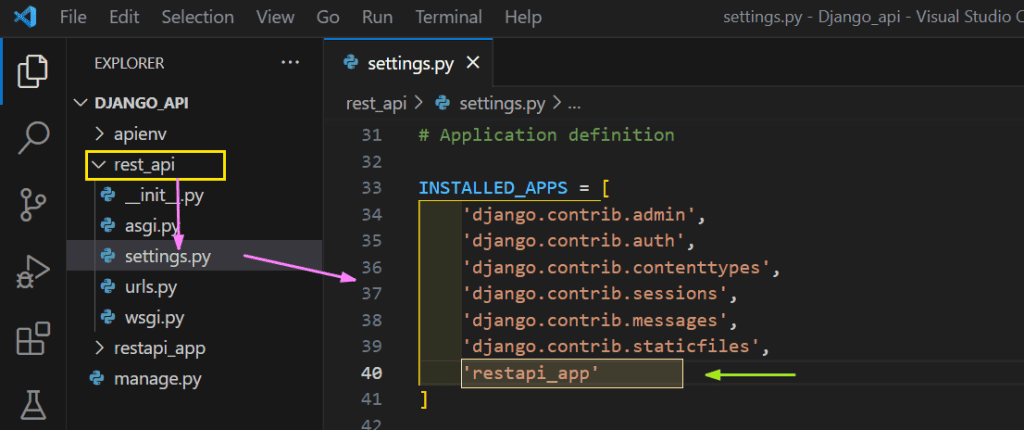
Add the created app ‘restapi_app’ in the INSTALLED_APPS section in the file ‘setting.py’ of your Django project ‘rest_api’.
INSTALLED_APPS = [
    ...,
    'restapi_app'
]
Then run the below command in your terminal or command prompt to migrate the default database and tables that come with Django.
python manage.py migrateNext, install the Django Rest Framework by running the below command in your terminal.
pip install djangorestframework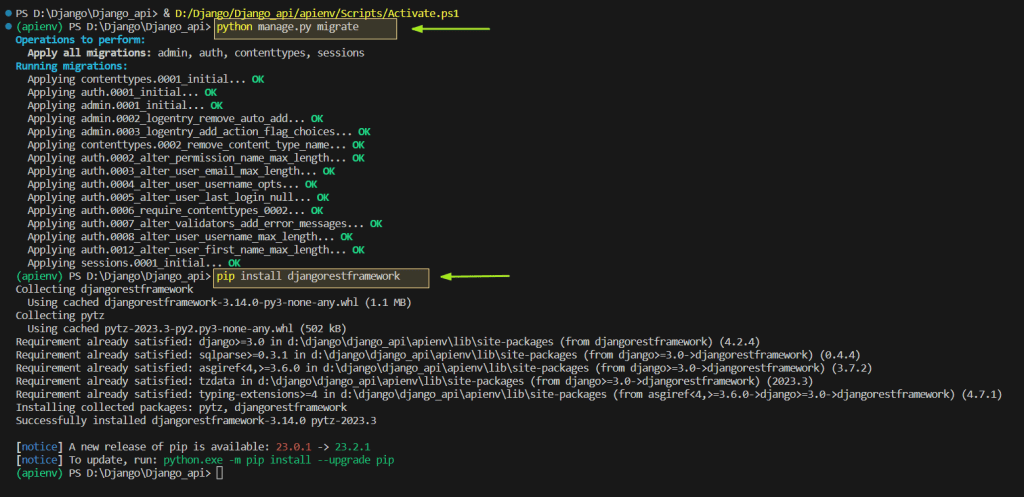
Add the ‘rest_framework’ in the INSTALLED_APPS section in the file ‘setting.py’ of your Django project ‘rest_api’.
INSTALLED_APPS = [
    ...,
    'restapi_app',
    'rest_framework',
]
Now you have set up the Django project for creating the rest API.
Creating the Dajngo Model
Create the model ‘CustomerDetail’ in the file model.py of your Django app ‘restapi_app’ by adding the below code.
from django.db import models


class CustomerDetail(models.Model):
    cusotomer_name = models.CharField(max_length=100,null=True)
    customer_email = models.EmailField()
    customer_city = models.CharField(max_length=10, null=True)
    customer_state = models.CharField(max_length=10, null=True)
    customer_country = models.CharField(max_length=10, null=True)

    def __str__(self):
        return self.cusotomer_name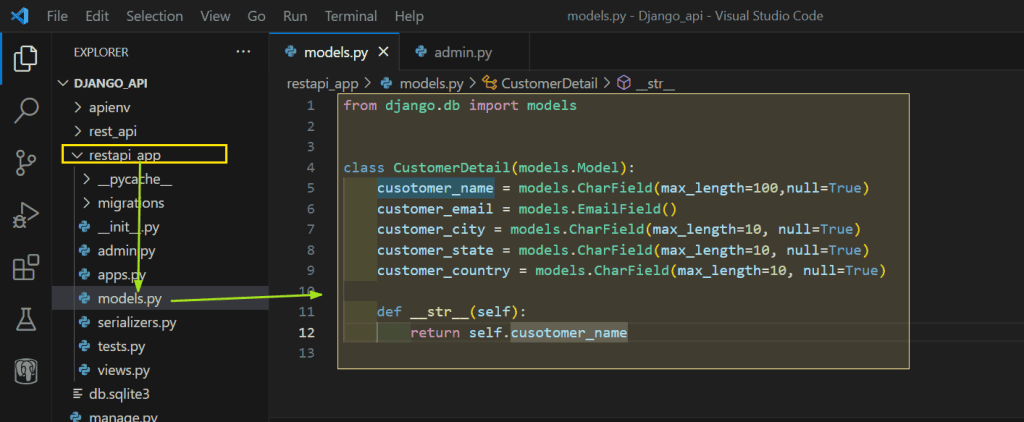
Register the model in the file admin.py of your Dajngo app ‘restapi_app’ using the below code.
from django.contrib import admin
from .models import CustomerDetail

# Register your models here.
admin.site.register(CustomerDetail)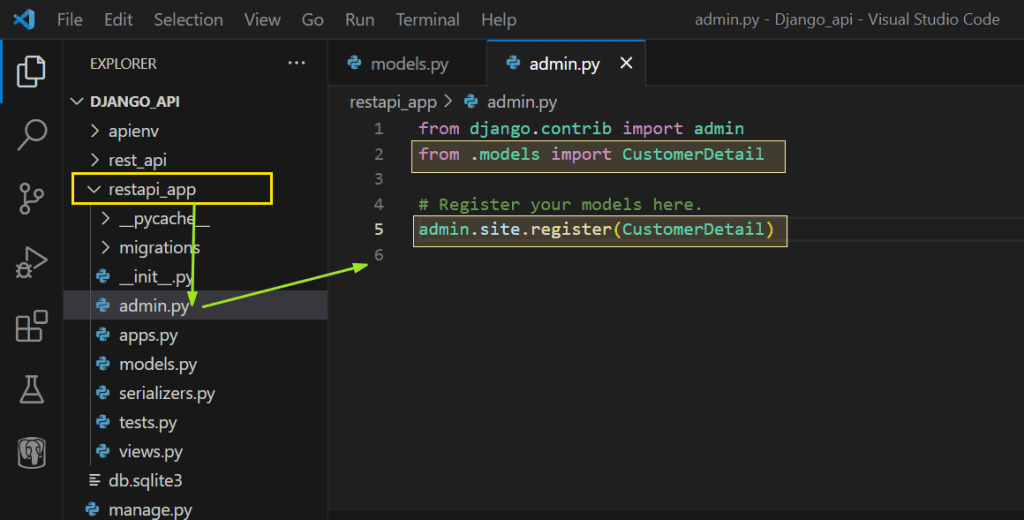
After registering the model run the below command one by one in your terminal to migrate the model into the database.
python manage.py makemigrations

python manage.py migrate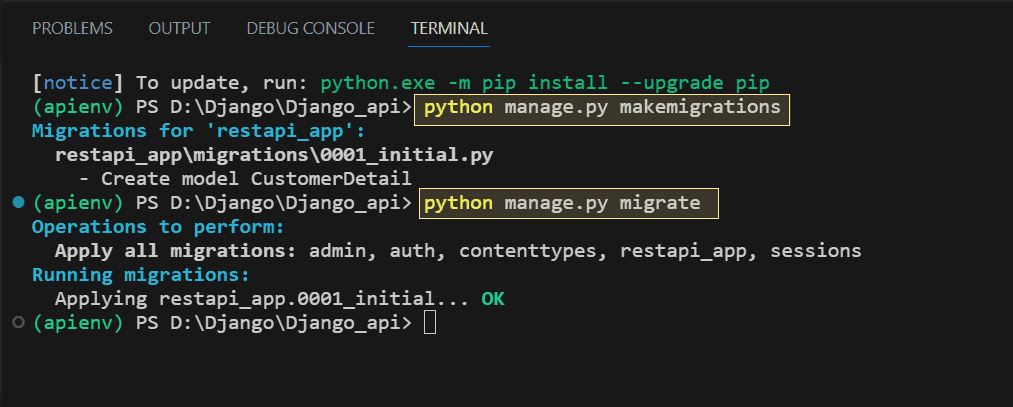
Creating Serializer in Django for Model
Serializers in Django convert the Django model into data formats so that this data format can be transferable or used by other applications or programming (as frontend part or javascript). Here you will use the Django Rest Framework to create a serializer in Django.
The Django Rest Framework provides a module serializer that contains the serializer class ModelSerializer and HyperLinkedModelSerializer. Using these serializers, your model or instances and querysets are converted into the data objects such as JSON, XML and etc.
Also, these serializers can deserialize your data into its original form.
Here you will use the ModelSerializer to serialize the model instance or querysets. To create a new file ‘serializers.py’ in your Dajngo app ‘restapi_app’ and add the below code to create the serializer of your model ‘CustomerDetail’.
from rest_framework import serializers
from .models import CustomerDetail

class CustomerDetailSerializer(serializers.ModelSerializer):
    class Meta:
        model = CustomerDetail
        fields = '__all__'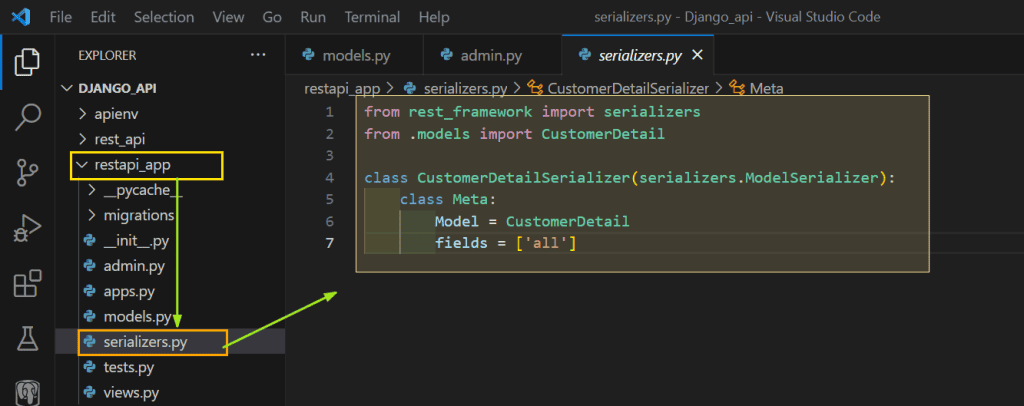
Creating View in Django for Rest API
To create a view that can list, and create items, Django Rest Framework provides a view classes Concrete Generic View.
First, create a view named ‘CustomerDetailView’ and add the following code.
from django.shortcuts import render
from rest_framework import generics
from .models import CustomerDetail
from .serializers import CustomerDetailSerializer

# Create your views here.

class CustomerDetailView(generics.ListCreateAPIView):
    queryset = CustomerDetail.objects.all()
    serializer_class = CustomerDetailSerializer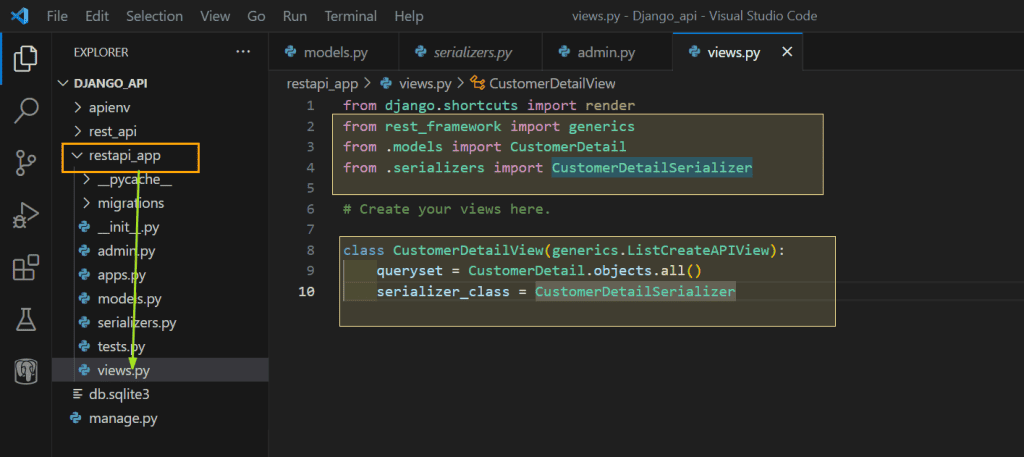
In the above code, import the generics from the rest_framewok, model ‘CustomerDetail’ from the file models, and CustomerDetailSerializer from the file serializers.
The generics have class ListCreateAPIView which handles the GET and POST method to list the item and create a new item. So in the above the class CustomerDetailView extends the concrete view ListCreateAPIView.
This kind of generic concrete view has a pre-built method like get, post and etc, you don’t need to define it handles implicitly.
The class which extends the concrete view ListCreateAPIView needs to do two things. the queryset and serializer_class.
- queryset: The queryset is the objects or instances of your model that you want to serialize, in this case (CustomerDetail.objects.all())
- serializer_class: which serializer class do you want to use to serialize that queryset or model instance, in this case, CustomerDetailSerializer.
The generics have many classes that you can use it extends your classes, which are shown below.
| Generic View Name | Description | Handler Method |
| CreateAPIView | To show a single instance in read-only mode | post |
| ListAPIView | To show multiple instances in read-only mode | get |
| RetrieveAPIView | To read and write for multiple instances | get |
| DestroyAPIView | To delete the single instance only | delete |
| UpdateAPIView | To update the single instance only | put, patch |
| ListCreateAPIView | To read and update for a single instance | get, post |
| RetrieveUpdateAPIView | To read and delete for a single instance | get, put, patch |
| RetrieveDestroyAPIView | To read, delete and update for a single instance | get, delete |
| RetrieveUpdateDestroyAPIView | To read, delete and update for single instance | get, delete, put, patch |
There are other ways to create APIs such as api_view.
Now define the URLs for the view by creating a new file called urls.py in your Django App ‘restapi_app’.
from django.urls import path
from .views import CustomerDetailView

urlpatterns = [
    path('customer/', CustomerDetailView().as_view(), name="list-create")
]
Also, define the URLs at the project level by adding the below lines in the file urls.py of your Django project ‘rest_api’.
from django.contrib import admin
from django.urls import path, include

urlpatterns = [
    path('admin/', admin.site.urls),
    path('', include('restapi_app.urls'))
]
Now create a super user for the admin panel by executing the below code in the terminal.
python manage.py createsuperuser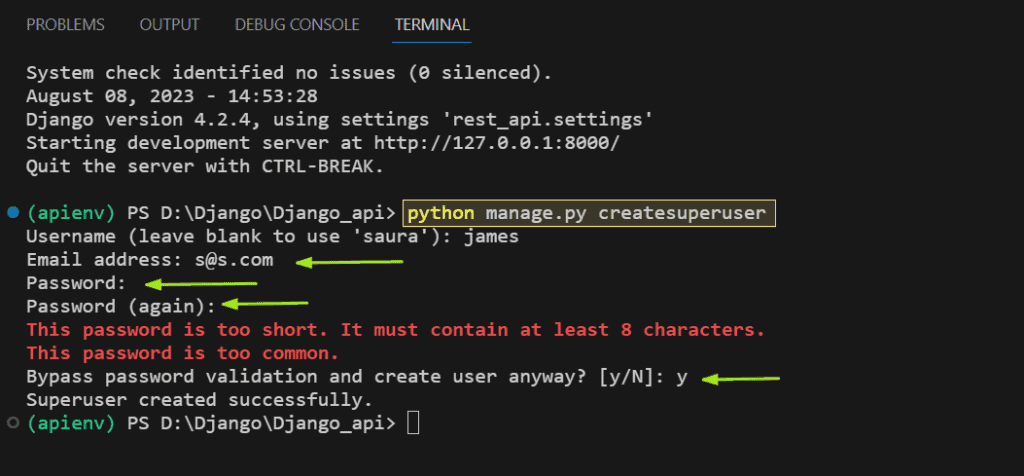
Run the Django server by running the below command in your terminal.
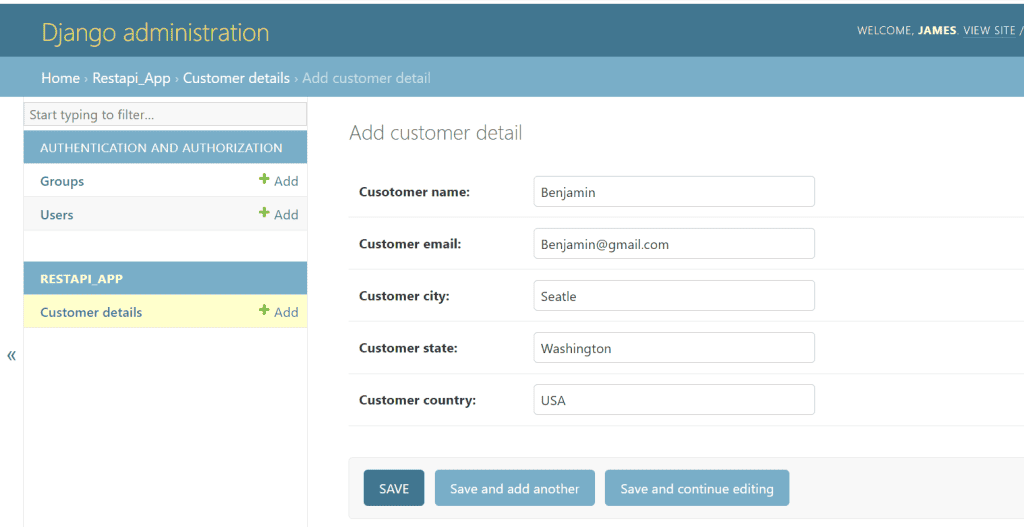
python manage.py runserverand open the URL ‘http://127.0.0.1:8000/admin’ and click on the Customer Details and add the following details and click on the Save button as shown in the below picture.
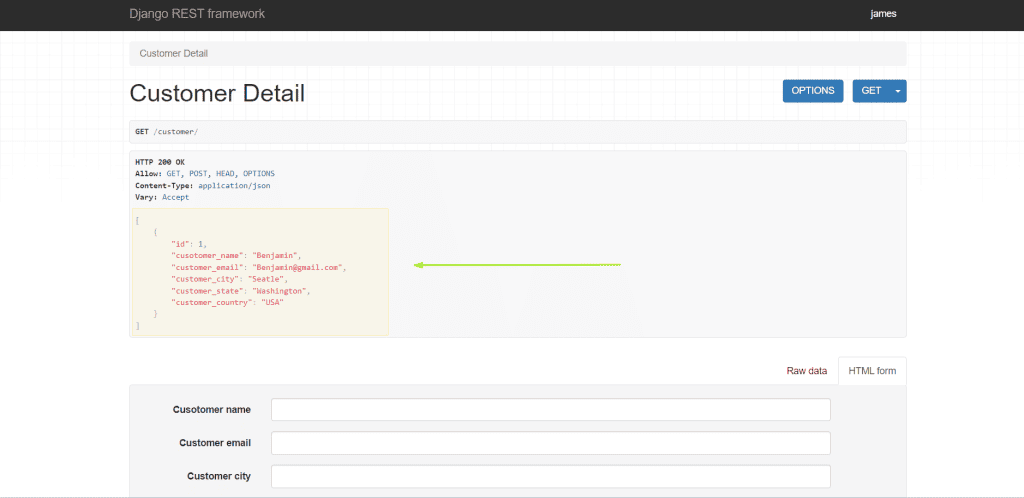
After adding the customer detail, open the URL ‘http://127.0.0.1:8000/customer/’ and you see the like this show in the customer information.
You can also add new customer data, just scroll down the page and fill in the HTML form and click on the button Post.
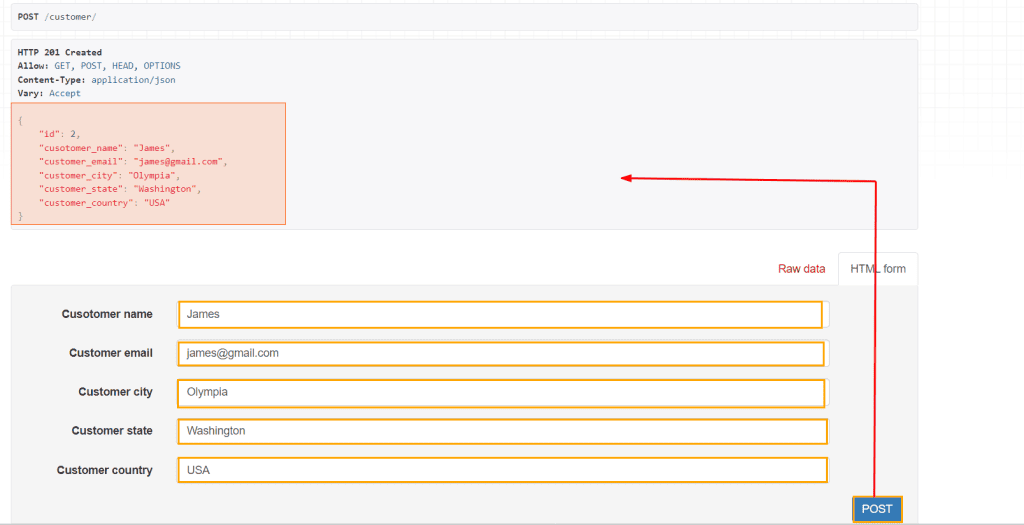
As soon as you clicked on the button Post after filling in the HTML form of customerJames who belongs to country USA, the customer data is added to the database and fetched at the same time, as you can in the above picture.
You have created the Rest API endpoint from which you can list and create the customer details.
Let’s decode the address ‘http://127.0.0.1:8000/customer/’, As I explained in the section REST API, the actual address is like this.

This means, making HTTP GET request to the server to get the customer details.
Conclusion
In this Python tutorial, you learned how to create REST API using Django REST Framework. Also, you learned about APIs and REST API and how it works. In addition, you learned about the serializers and etc.
You may also like to read:
- Create a Calculator app in Python Django
- Django CRUD with Bootstrap Template
- JWT Authentication Using Django Rest Framework

I am Bijay Kumar, a Microsoft MVP in SharePoint. Apart from SharePoint, I started working on Python, Machine learning, and artificial intelligence for the last 5 years. During this time I got expertise in various Python libraries also like Tkinter, Pandas, NumPy, Turtle, Django, Matplotlib, Tensorflow, Scipy, Scikit-Learn, etc… for various clients in the United States, Canada, the United Kingdom, Australia, New Zealand, etc. Check out my profile.