In this Python Django tutorial, I will show you file upload in Django, where you will understand how to upload files in Django.
I will introduce a field class FileField in Django that is used in the Django model for uploading a a file with different format to a specific directory on the server.
You will understand all these concepts by building a small project based on the blog. The user will fill the blog form with the author name, blog title, and the file that the user wants to upload.
Additionally, I will show you how you can upload different file formats such as PDF, MP4, etc.
File Upload in Django
Uploading means sending a file from a local computer to a remote system, which stores a copy of the material being transferred. It is possible to upload images, videos, movies, music, sounds, freeware, shareware, and text files.
To upload files in Django, Django has a field class called FileField, and this field class is used to handle different file types.
FileField is a model field class that is used to upload files. And, some of the common file formats are:
- MP4
- SVG
- MP3
- Docx
Syntax of FileField:
field_name = models.FileField(upload_to=None, max_length=254, **args)Also, check: Login system in Python Django
File Upload in Django Configuring Project
Create Virtual Environment: Open the command prompt and type the below command to create a virtual environment named ‘env’.
python -m venv enActivate the environment using the below command.
env\Scripts\activateInstall the latest version of Django.
pip install DjangoCreate Project And App: Firstly, we have to create a project and app. So, to create it follow the below steps:
Create a project named ‘file_upload’ using the below command
django-admin startproject file_uploadChange the directory to file_upload.
cd file_uploadCreate a new app named ‘app_file_upload’ using the below command.
python manage.py startapp app_file_upload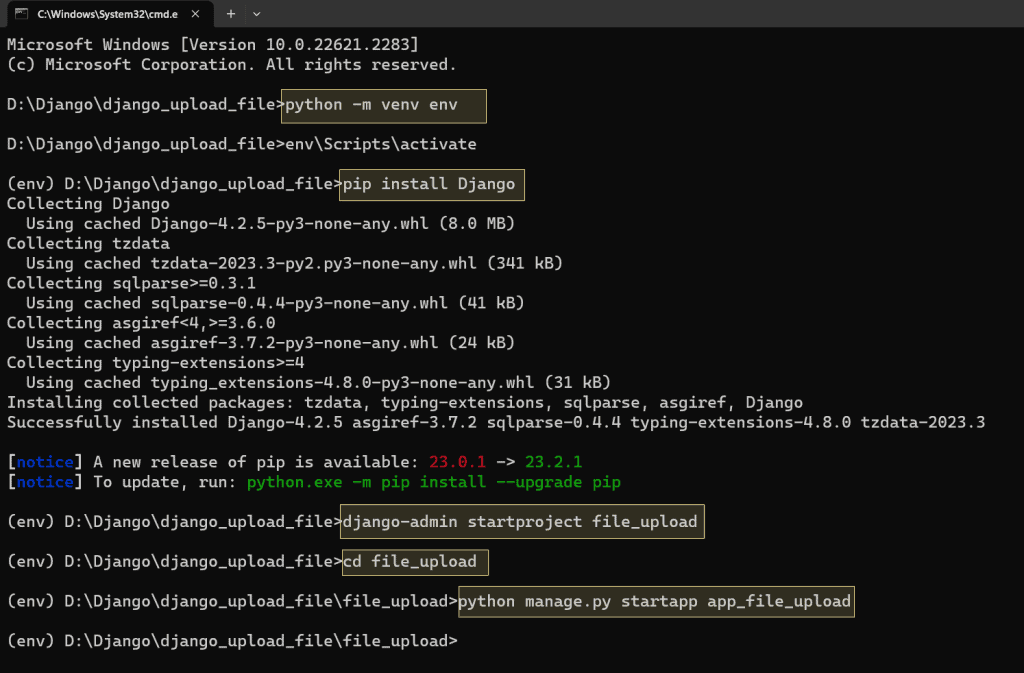
After creating the project and app, open the project in your preferred IDE such as Visual Studio Code.
Install App: After, creating the project and app successfully. you have to install an App. For this, you have to add our app in the settings.py file of your Django project ‘file_upload’.
INSTALLED_APPS = [
    'django.contrib.admin',
    'django.contrib.auth',
    'django.contrib.contenttypes',
    'django.contrib.sessions',
    'django.contrib.messages',
    'django.contrib.staticfiles',
    'app_file_upload',
]
To save uploaded files, modify settings: When you upload the files where will it save? You need to specify the directory path or URL where your uploaded file will be saved. So open the setting.py file of your Django project ‘file_upload’ and add the following lines of code.
import os
MEDIA_URL = '/media/'
MEDIA_ROOT = os.path.join(BASE_DIR, 'media')
- MEDIA URL: The URL endpoint is specified here. This is the URL where the user can upload their files from their browser.
- MEDIA ROOT: This defines the root path where the file will be saved.
- The second line directs Django to save all uploaded files in the BASE DIR, i.e., the project Directory, in a folder called ‘media’.
- We must manually create the folder so that all uploaded files are saved in the media folder.
Media Folder: Create a new folder called ‘media’ in the project folder.

Now, you have configured your Django project properly to upload the files in the media folder.
Here, you will create a small blog application where the user can specify the blog title, and name and upload the required files related to that blog.
File Upload in Django Creating Model and Form
Create Model: In the models.py file of your Django app ‘app_file_upload’, create a new Django Model “Blog” and then add the following code.
from django.db import models

class Blog(models.Model):
    author = models.CharField(max_length=100)
    title = models.CharField(max_length=200)
    file = models.FileField(upload_to='documents/')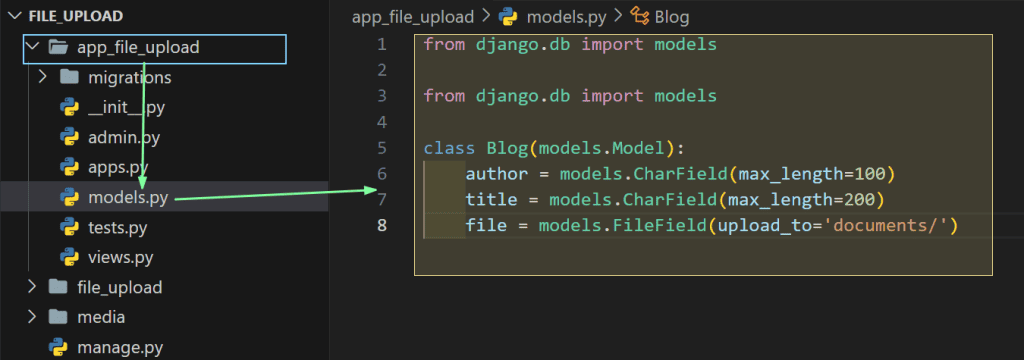
In the above code,
- We define the field author of type CharField, which stores the name of the author who uploads a file.
- Then, we create one more field title of type CharField, which stores the title of the file that the user uploads.
- Then, we use the FileField for files that the user will upload. The upload_to option defines the location within the media where the file will be saved.
After creating the Blog model, create a blog form that will appear on the webpage where the user can fill in details and upload the files.
Create Form: First, create a new file forms.py in your Django app ‘app_file_upload‘ and add the following lines of code.
from django import forms
from .models import Blog

class BlogForm(forms.ModelForm):
    class Meta:
        model = Blog
        fields = ['author', 'title', 'file']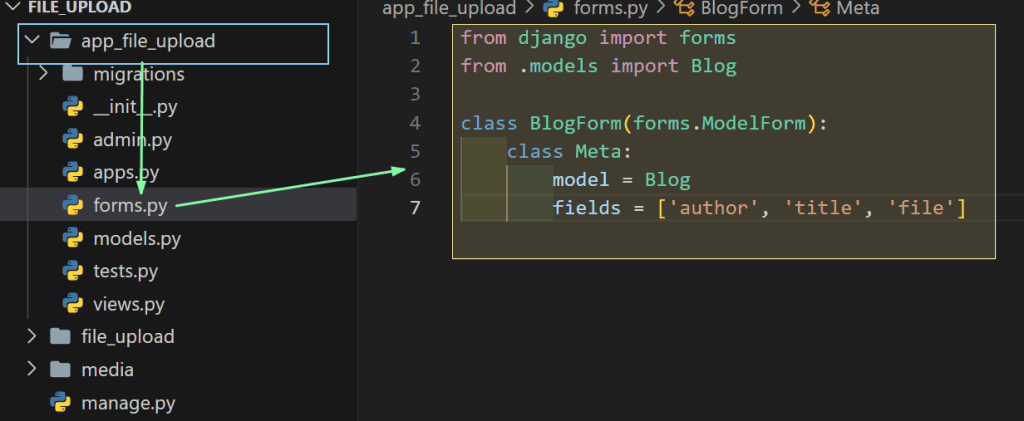
In the above code, import the “Blog” Model into forms.py and create the “BlogForm” using the Django class ModelForm which automatically creates forms based on the provided model.
If you want to know about ModelForm, then refer to the tutorial Create Model Form in Django.
File Upload in Django Template and View
The next step is to create an HTML page that will render this form, so for that create a new folder named templates in your Django app ‘app_file_upload’.
Create HTML Template: Now, create an upload.html template that shows the form. Add the following lines of code in the upload.html file.
<!DOCTYPE html>
<html lang="en">

<head>
    <meta charset="UTF-8">
    <meta http-equiv="X-UA-Compatible" content="IE=edge">
    <meta name="viewport" content="width=device-width, initial-scale=1.0">
    <title>Upload Files</title>
</head>

<body>
    <form method='post' enctype="multipart/form-data">
        {% csrf_token %}
        {{form.as_p}}
        <input type="submit" value="Submit">
    </form>
</body>

</html>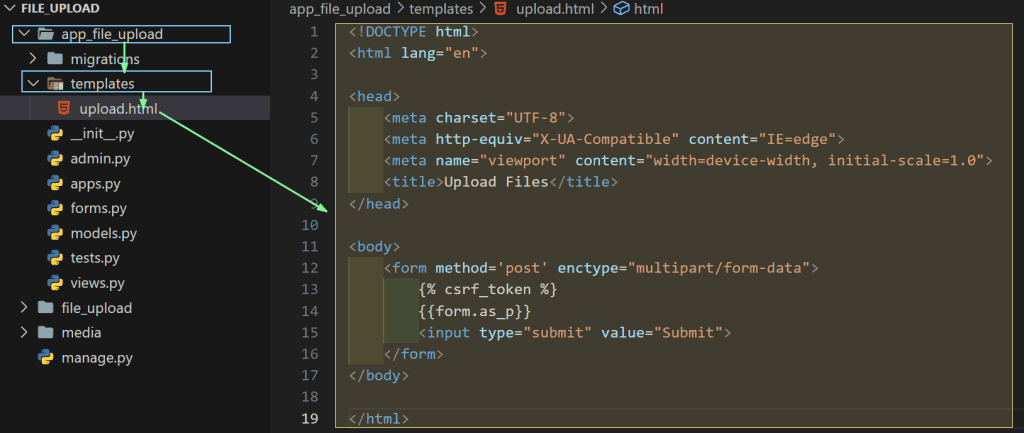
In the above code,
- Now, create the <form> tags in the template file.
- Next, add the property enctype =”multipart/form-data” otherwise, the form won’t work.
- We also use the csrf_token Django template tag in the form to avoid malicious attacks.
- Then, we use form.as_p tag to render Django forms as a paragraph.
Now create a view that will handle the submitted data through the form.
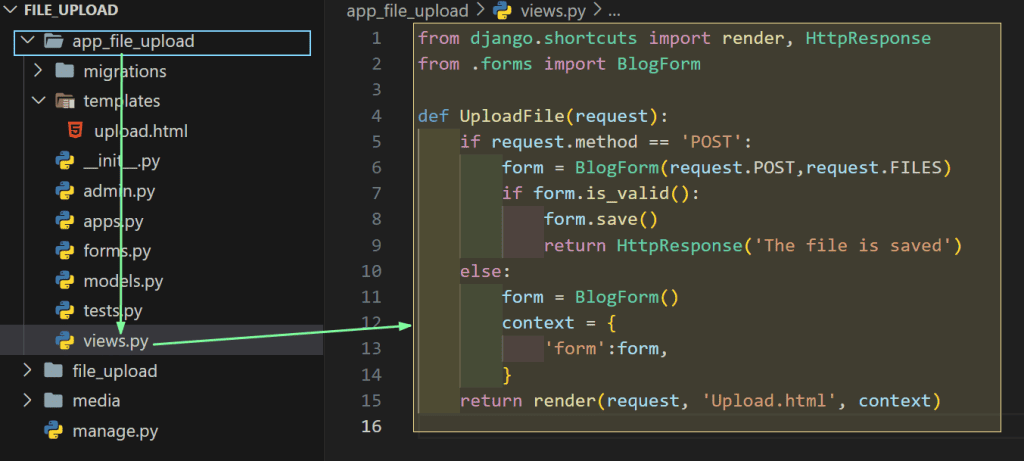
Create Views: Implement the form in the views.py file. Here, we need to upload the files. So, simply add the request.FILES along with the request.POST.
Add, the following code snippets to the views.py file.
from django.shortcuts import render, HttpResponse
from .forms import BlogForm

def UploadFile(request):
    if request.method == 'POST':
        form = BlogForm(request.POST,request.FILES)
        if form.is_valid():
            form.save()
            return HttpResponse('The file is saved')
    else:
        form = BlogForm()
    context = {'form':form,}
    return render(request, 'upload.html', context)
In the above code,
- Here, we create the UploadFile view function.
- Then, we check whether the request method is POST or not at line 5.
- After this, we simply add a request.FILES along with the request.POST to the form method, which means any file exists in the request that will also be included in line 6.
- After line 7 use the is_valid() method on the form instance to check whether the details in the form are correct or not. If the form is valid, then the save() method is called to save the form details into the database at line 8.
- Then at line 9, return to HttpResponse to the user with the message ‘The file is saved’ and from lines 10 to 15 render the HTML template with form if the request is not POST method or in case of any errors.
Now you have defined the model, form, and view for uploading the file, let’s set up the URL to map the specific URL to a view for passing the request to a specific view to handle the submitted data.
App URLs: Create a new file urls.py in your Django app ‘app_file_upload’ and add the following lines of code.
from django.urls import path
from . import views
urlpatterns = [
path('UploadFile', views.UploadFile, name='UploadFile'),
]
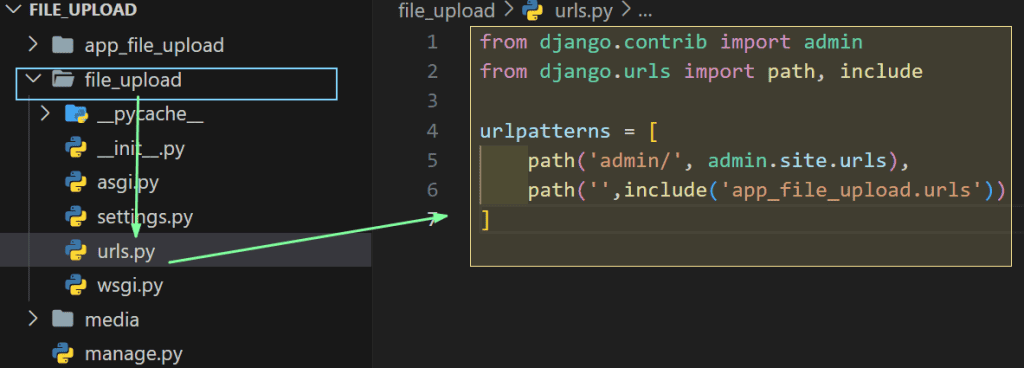
Project URLs: After this also set up the Django project-level URLs. You have to specify the urls.py file that you have created in your Django app ‘app_file_upload’ in the urls.py file of your Django project ‘file_upload’. For that add the following lines of code.
from django.contrib import admin
from django.urls import path, include

urlpatterns = [
    path('admin/', admin.site.urls),
    path('',include('app_file_upload.urls'))
]
Django Database Migrations: It is the process of transferring changes made to a model to the database schema. Run the following commands in the terminal one by one.
python manage.py migrate
python manage.py makemigrations
python manage.py migrate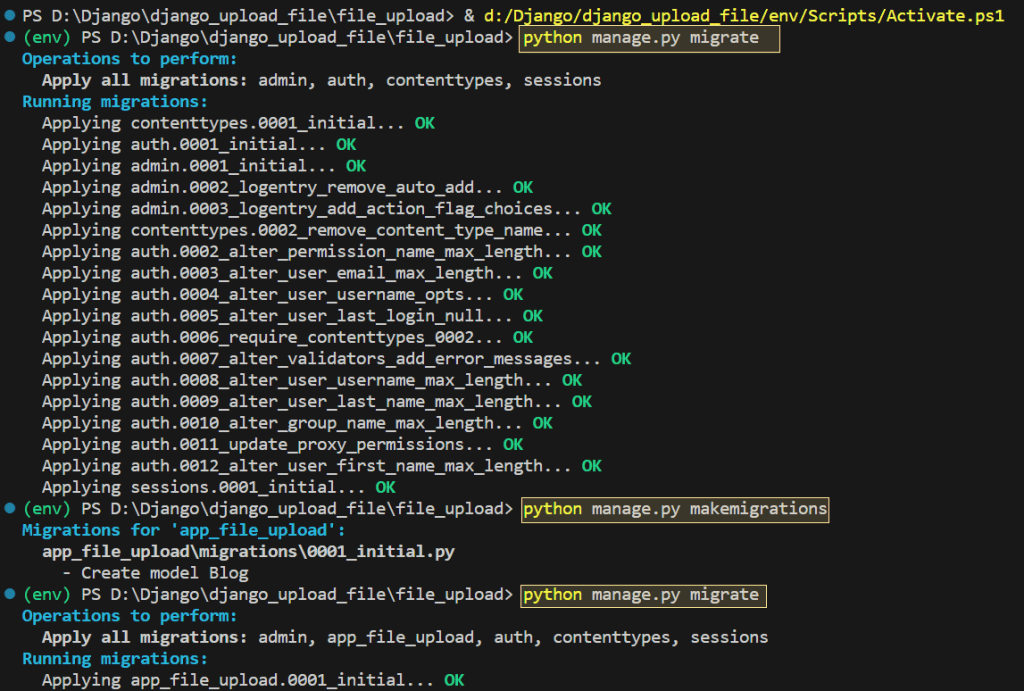
In the above code,
- makemigrations: is used to make a migration file that includes code for a model’s tabular schema.
- migrate: is used to create tables in accordance with the migration file’s schema.
Run Server: Now it is time to upload the file, so start the server using the below command.
python manage.py runserverAfter running the server, you see the page as shown in the below picture.

Then fill blog form and click on the button ‘Choose file’ to upload the file from your local computer, in my case I have chosen the file named ‘Django Introduction.docx’ as shown in the below picture.

After choosing the file, click on the Submit button to submit the form, and this submitted form data is sent to the view UploadFile that you have created above.

After clicking on the Submit button, the view returns the HTTP Response that contains the message “The File is saved”.
If you remember about the folder Media that you have created for saving the uploaded files.
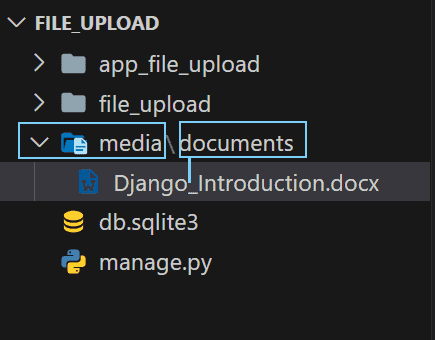
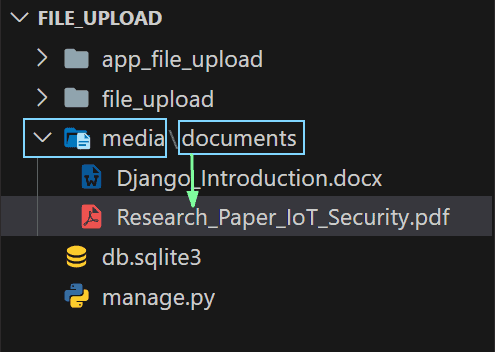
View file in Media: You can see, the file is successfully stored in the Documents directory under the Media directory.
You can also upload pdf-based files. Let’s have a look at it.


Even you can upload files in mp4 format.
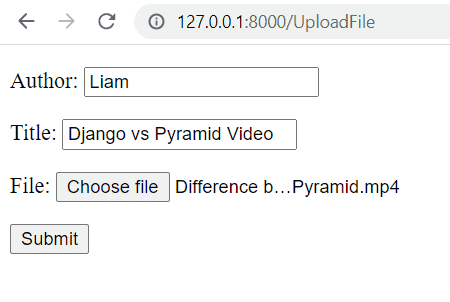
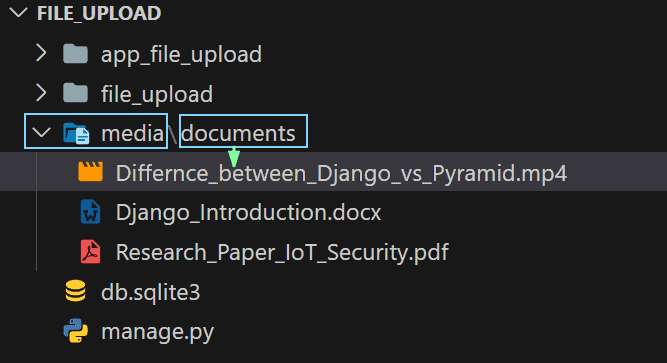
You have successfully uploaded the different files such as docx, pdf and mp4.
Read: Outputting Python to HTML Django
In this Python Django tutorial, you learned how to upload files in Django, where you uploaded the different file formats into your Django server. Also, you learned about the field class called FileField in Django.
You may like to read:

I am Bijay Kumar, a Microsoft MVP in SharePoint. Apart from SharePoint, I started working on Python, Machine learning, and artificial intelligence for the last 5 years. During this time I got expertise in various Python libraries also like Tkinter, Pandas, NumPy, Turtle, Django, Matplotlib, Tensorflow, Scipy, Scikit-Learn, etc… for various clients in the United States, Canada, the United Kingdom, Australia, New Zealand, etc. Check out my profile.